Pages

Sunday, December 4, 2016

Focke-Wulf Fw 190 D-9 | 1/12 th Scale | Part Ten – Lithoplating
Right side of center fuselage: I added the front panel (took 3 attemps :-( ).
I use tape for defining the shape and rivet lines for the rear panel.

I transferred the info from the tape onto lithoplate.
It was then cut to shape and the rivets were embossed.

The rear panel glued in place. Needs some clean up ...

Saturday, November 19, 2016

Focke-Wulf Fw 190 D-9 | 1/12 th Scale | Part Nine – Lithoplating

Right shell of the extension glued in place.

Hatch in the extension. Some details are still missing.

Rear deck. I added a center slot for the sliding canopy.

I added the riveting, some details still missing.

Frame 8 was also plated, the floor is still unplated.

Saturday, November 12, 2016

Focke-Wulf Fw 190 D-9 | 1/12 th Scale | Part Eight – First lithoplating

The bending was done in 3 steps:
1. On a thin rubber matt.
2. On a folded cotton tissue
3. On a piece of soft foam.

I tried to make a close fit so glueing is less stressful.

I added the rivet pattern using the template and a
stone bedding tool, DIA 0.45 mm.

Glueing brought a problem. The grey primer was dissolved
by the solvents of the contact glue and that
made it difficult, more difficult than necessary!
Lessen learned: sand off grey primer prior to glueing!

I got a rivet template from Peter/Airscale for free!
THANK YOU PETER! :-)

I am happy with the outcome of the lithoplating so far.
The extension plug has no compund curves ;-)

Saturday, November 5, 2016

Focke-Wulf Fw 190 D-9 | 1/12 th Scale | Part Seven – First metal work: joggle joints

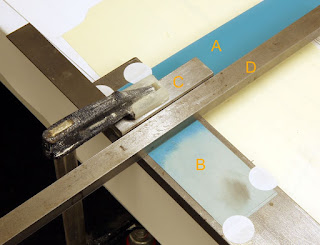
The fuselage extension plug is made of 2 shells: left and right. The right shell overlaps the left one in a joggle joint at the spine and bottom.
A: Material defining the height of the joggle joint. In this case 0.15 mm
B: Shell plating of 0.15 mm litho plate for the left side.
C: Stop block for D.
D: Embossing tool for the joggle joint

0.15 mm isn´t very much, but it is there! ;-)

Macro of the joggle joint. The right shell will overlap the recessed portion.

Sunday, October 30, 2016

Focke-Wulf Fw 190 D-9 | 1/12 th Scale | Part Six – Attaching center fuselage to fuel tank chamber

Fuel tank chamber and center fuselage section were
glued together using 5 min epoxy.

Bottom view of the subassemblies shows the sharp edges
of the fuel tank chamber in contrast to the rounded cross sections
of the center fuselage to advantage.

The engine mounting frame (right) was also added.
It aligns with the canopy deck in a straight line.

The fuselage extension plug is made of two
plywood frames and a balsa core.
Total width 41.5 mm

Rear view showing the canopy deck with a groove
for the sliding mechanism of the plexiglas hood.

The groove is 0.8 mm deep and cut with the table saw.

Sunday, October 23, 2016

Focke-Wulf Fw 190 D-9 | 1/12 th Scale | Part Five – Shape and sanding

Fuel tank chamber: After sanding I applied wood filler.

Frame 1 will be attached once the filling and
sanding is completed.

Center fuselage section: Sanding is almost complete.

Next step is to apply a coat of wood filler.

The canopy deck is still missing a
1 mm plywood panelling.

Angular shape of the fueltank chamber has a
smooth transition into the curved center fuselage.

Dry fitting of both subassemblies.

It starts to look like an aircraft ... :-)

Monday, October 17, 2016

Focke-Wulf Fw 190 D-9 | 1/12 th Scale | Part Four – Shape vs. Material Stress

To minimize material stress and to allow for a
curved balsa shell I cut thin slots into
the backside of the balsa stripe.

I poured superglue into the grooves and bent the balsa.
A shot of activator secured the balsa immediately.

The balsa shell glued into the framework.
It starts to look like a ... whale?!

Saturday, October 15, 2016

Focke-Wulf Fw 190 D-9 | 1/12 th Scale | Part Three – Center Fuselage section and fuel tank chamber

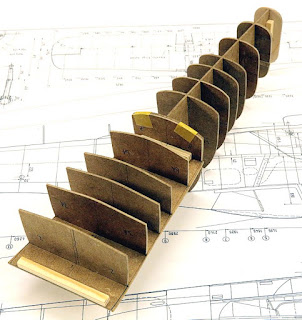
I cut frame 1 Motoranschlussspant from 2mm plywood
for its greater strength over MDF.

Cockpit floor (frame 1 to 5) and
luggage compartment (frame 5 zo 8).

I added balsa blocks cut from 8 mm board
between the MDF frames.

Dry fitting of the jack up pipe from 5x4 mm alu pipe.

Thursday, October 13, 2016

Focke-Wulf Fw 190 D-9 | 1/12 th Scale | Part Two – Center Fuselage section and fuel tank chamber

The Behälterraum (fuel tank chamber) temporarily fitted to
the rear section framework. The top of the chamber is
part of the cockpit floor.

The jack up pipe is located on frame 13.
A cut-out is therefore necessary in the MDF frame.

Bottom view of the framework. Frame 1 will be
added soon at the very front of the framework.
This will be the engine mounting frame done from
plywood rather than MDF.

The outline of the cockpit floor is not yet finished.

Sunday, October 9, 2016

Focke-Wulf Fw 190 D-9 | 1/12 th Scale | Part One – Center Fuselage section

It´s time for my first scratch build aircraft replica. I came across Arthur L. Bentley´s beautiful plan set of the Langsnase in 1/12th scale. I also bought the hand book and spareparts list from Luftfahrtarchiv Hafner. So let´s get started!

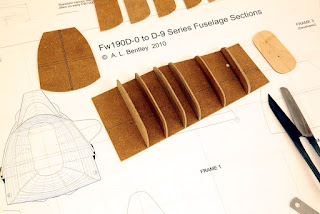
Mr. Bentley´s drawings contains all frames of the fuselage.

The frames will be glued to a longitudinal frame.

Between the frames blocks of balsa will be glued
and then sanded to shape.

Friday, August 19, 2016

Hansa-Brandenburg W.12 Early | Wingnut Wings 1/32 | Part Seven

I started to paint the pilot figure.
Underpainting of Tamiya flat buff and oils for the leather.

I casted the second epoxy layer.
Now the Hansa is afloat ;-)

Once the epoxy is fully cured I will demould the base.

Just an impression :-)

Sunday, August 14, 2016

Hansa-Brandenburg W.12 Early | Wingnut Wings 1/32 | Part Six

Casting the Sea


I casted the first layer of SKresin 72,
a slow curing clear epoxy resin.


The Hansa is placed and posisioned on a
simple jig made from balsa.

The jig defines the height of the float plane above "sea level".

The jig takes also care of the angle of attack of the lower wings.

Shells made from PE by INDUSTRIA MECHANIKA
and MAGIC SCULP.

Fish are also made from PE by INDUSTRIA MECHANIKA and
some MAGIC SCULP.